Email: hello@practicalwomen.co.uk

Tel: 07490 764877

considerate professional tradeswomen

practical advice & help for your home

How to reset an RCD

How to reset an RCD

What is an RCD?

A Residual Current Device is a safety device which is now, fortunately, pretty common in most domestic electrical supplies.

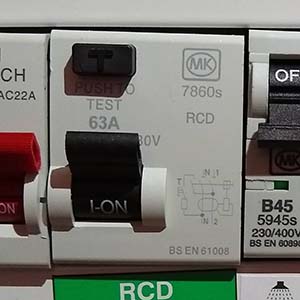
If you’re not sure whether you have one, it should look something like this:

There will usually be a small reset button on it, sometimes red or yellow. 

It will either have RCD, RCCB or RCBO written on it. 

How does an RCD work?

An RCD measures the current in the circuits that it controls. It measures the current leaving and returning. If there is an imbalance, it assumes that some of the current has leaked out and is causing a danger. The current is immediately (or, at least within 300 milliseconds) switched off and there is no longer any power. 

How do I reset an RCD?

RCDs are designed to be reset. Sometimes they trip for no apparent reason. They can be tripped by a lightbulb blowing. It isn’t always an indication of a problem.

If the lever on an RCD is in the DOWN position, it is off. To reset it, the lever simply needs to be pushed back UP. For some RCDs, it is necessary to push the lever fully downwards before it will let you push it back UP and reset.

In many cases, this will be fine. The RCD will reset and all will be well. However, if there is a fault on your system somewhere, the RCD may not reset, or may reset temporarily, only to trip again a few seconds/minutes/hours later. If this happens, then you may well have a problem which needs to be addressed. The RCD is telling you that something is not right and you need to investigate.

To work out whether this is something which you can resolve yourself, or whether you need to call in an electrician, there is a simple procedure to follow.

My RCD won’t reset. What should I do?

  • If you were in the house when the RCD tripped, ask yourself what happened just before the RCD tripped. If you had just turned the Kettle on, or switched on the Iron, there’s a possibility that this may be the cause of the problem. Fully unplug the Kettle/Iron and reset the RCD. If the RCD resets and stays reset, then you have probably found your culprit.


  • If you just drilled through a wall and the RCD tripped, there may be a strong link between the two events. It is quite possible that you may have drilled through, or otherwise damaged a cable. If you didn’t check the positions of cables prior to drilling, you have just learnt a useful, but possibly quite expensive lesson. Its time to call in an electrician to repair the damaged cable as soon as possible. It is quite likely that the RCD will not reset until the damage has been repaired.


Next time you get the drill out, it would be worth checking out one of our other posts on the inappropriately named Safe Zones. Contrary to their name, these are areas where it is actually dangerous to drill, as they could legitimately hide cables.

If you look at the Safe Zones post and realise that you did, in fact, drill straight into one of these safe zones, please call an electrician as soon as possible. There may be some brown scorch marks, or even a bit of smoke coming out of the hole – all signs that things are not well.

How to identify the cause of a fault

If neither of these scenarios applies and the RCD seems to have tripped for no reason at all, there is a straightforward procedure to follow, which in most cases will identify where the problem lies.

Stage 1

Your Consumer Unit should be properly labelled. The RCD will be labelled and the fuses (or MCBs) controlled by it, also labelled. Hopefully it will look something like this:

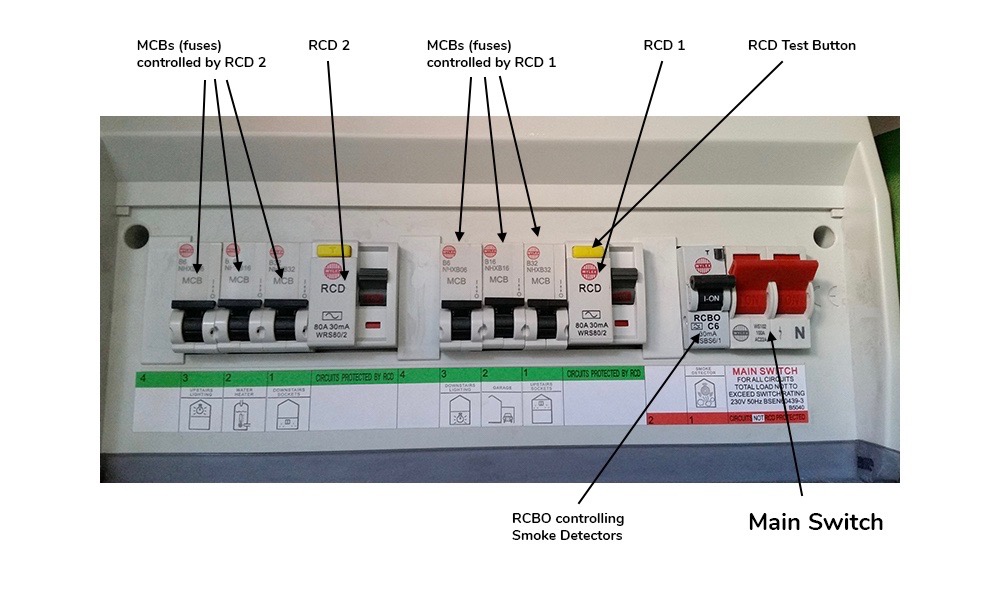
Make a note of the names of the circuits which are covered by the RCD.

Firstly switch off the RCD and all the fuses (MCBs) controlled by it. All the levers should be pointing DOWN

In this case, lets imagine that RCD 2 is the problem. The circuits covered by RCD 2 are:

  • Downstairs Sockets
  • Water Heater (Probably the Boiler)
  • Upstairs Lights

Turn off all those fuses (Lever pointing DOWN). Then unplug everything that is plugged into the Downstairs Sockets.

If the Boiler is also not working, and you don’t have an immersion heater in your house, it is quite likely that the “Water Heater” circuit applies to the Boiler. If it is plugged in, pull the plug out. If it has a fused spur, then pull the fuse out of the fuse holder on the fused spur.

At this point, still with all the fuses turned off, try to reset the RCD. If the RCD stays in the ON position, then you have successfully completed Stage 1.

Stage 2

Now, we need to identify which circuit is causing the problems.

Start with the Downstairs Sockets.

First turn on the fuse (MCB) for the downstairs sockets, and see if the RCD also stays on.

If it doesn’t stay on, check that you have definitely unplugged everything on that circuit.

  • Might there be something plugged in in a cupboard that you had forgotten about?
  • Is there an outside socket?
  • Are the lights under the kitchen cabinets run from a fused spur in the Kitchen?

It is very easy to miss something at this stage, so you may have to really rack your brains. Cooker Hoods are an easy one to miss.

If you are pretty sure that everything has been unplugged and you still can’t reset the RCD, it is time to call an electrician. This scenario (which is pretty unlikely) would suggest that there may be a problem with the wiring or something on the circuit.

If the RCD remains on, then go round and plug in each of the appliances that you previously unplugged. Switch each one on. If at any stage, the RCD trips, you have found your culprit.

If the RCD remains on while you plug everything back in, it appears that the problem isn’t on this particular circuit.


Stage 3

Move on to the next circuit and do the same thing.

In this case, it is the boiler circuit, so it will just be a case of putting the fuse back in and switching the boiler on.

If the RCD trips at this point, there could be an issue with the boiler. Take a look to see if there are any signs of water under the boiler. A leak from a boiler onto the controls is a common cause of this kind of problem. If you suspect that this is the case, you need to call a Gas or Boiler Engineer.


Stage 4

Finally turn on the third circuit. In this case, it is the Upstairs lighting Circuit. To save time,  you have left all the light bulbs in their fittings. If the RCD trips when you turn the fuse (MCB) for the lights back on, take all the lightbulbs out, just in case one of them is causing a problem, and switch the Fuse back on.

If the RCD stays on, put each light bulb back into its fitting in turn. For safety’s sake, make sure that you turn the fuse (MCB) off each time that you put a bulb in, and turn it on once the bulb is in position.  If the RCD trips when you put one of the bulbs back in, then that will be your culprit.


How do I turn my water off?

How do I turn my water off?

We have lost count of the number of houses we have been to where the customer has no idea how to turn their water off in an emergency. This is one of those life skills it is much easier to learn before you actually need it. Learning it, just as water is pouring out of a broken pipe, can often feel a lot harder.
If you do know exactly where your stop cock is, can turn it on and off easily, and, in fact, regularly practice for just such a scenario, give yourself a congratulatory pat on the back and move onto another topic. (Actually, if you are that kind of person, you may just need to skip this whole blog post. The basics are not for you).
If you’re not sure, or only have a vague idea, it might be worth reading a little bit further.

External Stop Tap

If you’re lucky, your water may turn off in the street outside your house. There will be a little metal or plastic manhole cover on the pavement looking much like this. There is a often a clue stamped on the top. (If the word “GAS” is stamped on the top, you are not looking at your Water Stop tap):

You may need a flat-headed screwdriver or other improvised tool to prise the top up. (Its quite common for the top to have been glued down during a pavement resurfacing. You don’t want to find this out in an emergency).

Very occasionally, you may come across a style which turns, rather than lifts. If attempts to prise the lid off fail, you may have one of these. They can be a bit awkward to get the lid off, and thankfully, they don’t seem to be installed these days. Just try twisting the lid, anti-cllockwise (in the direction you would turn a tap on), using the blade of the screwdriver, and hopefully it will move.

Once you have the lid off, you will see either an old style brass tap, or a newer plastic tap. If you’re unlucky, the Brass Tap may have seized up and won’t move. Sometimes it helps to try to open the tap rather than turn it off. This allows it to move, and then you can close it.


If you have a plastic tap, there should be a plastic key to operate it, under the lid. If you can’t see one, open up one of your neighbours’ Stop Tap covers and borrow theirs. (That maybe why you don’t have one). For some reason, the plastic taps are often quite hard to turn off completely. It might feel that you’re about to break the plastic key before it actually stops the final dribble.

If the stop tap is a long way down, you may need a Stopcock Key to turn it. That’s something else you may not be able to get hold of in a hurry.

Useful Tip 1: When turning any brass tap on, always turn it to its fullest extent and then turn it back about a 1/4 turn. This gives the tap somewhere to move to, if it seizes up.

At this point you should give yourself a pat on the back.


  • If you’re in the middle of an emergency, you have prevented any more damage being caused.
  • If you’re being proactive and preparing yourself for an emergency situation, you now know that your External Stop tap does (or doesn’t) turn off.
Your local Water supplier is responsible for the External Stop Tap. If it isn’t working, or is leaking, it is their responsibility to come out and repair it. Bristol Water have some useful information on their site about what do in this eventuality.

Internal Stop Tap

Some people have some idea about where their Stop Tap is inside their house. A good place to start looking is under the Kitchen Sink. Usually, in my experience, this means pulling out an odd assortment of cleaning products, congealed packets of washing powder and cleaning cloths in order to actually reach it. However, when you get there, it may look as this:

If it isn’t there, these are some of the other places worth looking:


  • Just inside your front door – how lucky you are – in a box marked “Water Stop Tap” – Ok, we can all dream.
  • Maybe in an outhouse, the old lean-to toilet in the back garden, in the garage…..
  • Under the floorboards – I’m not joking. I have found many stop taps hidden away under the floor – what were they thinking? Wobbly floorboards, not screwed down can be a bit of a giveaway for this particular scenario. (Our original Stop Tap was just out of reach if you took up the loose floorboards in the porch, laid on your front and stretched as far as possible. I can only assume they sent small children down there in the old days.)
If it isn’t in one of these places, then you can assume that either you don’t have one (not unusual), or that you may have one in an obscure position which nobody has know about for decades. If that is the case, the chances of it still being able to turn are pretty obscure.
Useful Tip 2: At the next available opportunity, employ a Plumber to install an internal Stop tap for you in a sensible, accessible position.

Do I need an Internal Stop-tap?

In a word, no. There is no requirement for you to have an internal stop tap. If your external stop tap works well and is easily accessible, then you may not need to have one.

In the event of an emergency, for instance a plumbing fitting failing in the first floor bathroom,  the time it takes for you to run down the stairs, find a flat-headed implement (to prise off the cover), locate a headtorch, put your slippers on and get out to the external stop tap, several litres of water may have flooded through your Kitchen ceiling (and light fittings).

There are alternatives to the traditional Tap-like Stop-tap, which can be awkward and stiff to use. They require a degree of force and dexterity, and as we have discussed can be in inaccessible places. 

One option is a Lever-style tap, such as this. They have a very definite action, are easy to operate and are less likely to seize up. 

Another alternative is the Surestop Stopcock. This can be installed at a distance from the pipework. It is operated by what looks like a large Lightswitch. It employs a pressure switch, which means there is a very slight delay between pressing the switch, and the water flow stopping, but is still very quick and is extremely easy to operate.
It is recommended that this is installed as an additional means of isolating the water supply, so it is ideal if you have an external Stop-tap. It really should not be your only means of turning off the supply.


Whether you decide to have an internal stop-tap installed, or rely on an external stop-tap, we strongly urge you to go and check that one or other, or (in a perfect world, both of them) work and that you know how to access and operate them in a hurry. Please don’t wait until you need to do this in an emergency. 

Watersafe have published a useful video to hunt out your internal Stop Tap:

Kitchen project in Southville

Kitchen project in Southville

Kitchen Project in Southville

This kitchen project was undertaken in 2019, in South Bristol. The house is a traditional Victorian terrace with a small garden to the rear. As with many such houses, the kitchen was at the rear of the house, separated from the dining area by a large chimney breast.

 The chimney breast was completely removed and a supporting RSJ installed. This created a large room with space for a galley kitchen and a spacious dining area. The old dresser was retained and painted to match the kitchen cabinets.

Double doors were installed at the end of the kitchen, opening out into the south-facing garden.

In order to maximise the light, and give some climate-control, a large electric smart Velux window was installed in the roof above the kitchen. 

The boiler was moved, and installed into a large cabinet in the corner of the kitchen.

Plumbing, electrical work & kitchen fitting were carried out by the Practical Women team.

Central Heating work by Greentech Heating & Plumbing.

Kitchen cabinets were supplied by Nailsea Electrical in Bristol.

Structural work was carried out by Stepping Stones Building.

Thinking of a New Kitchen?

If you’ve been thinking about having a new Kitchen, and don’t really know where to start, here are some helpful tips to get you started